【Python+Google Analytics】はてブのアクセス解析をやってみた①
どうも、Keiです。
台風が2連続で来ていますね。今年の日本の天気からは、紅葉に見惚れる隙も与えず冬に直行させるという鬼畜っぷりが伺えます。

さて、今回ですが当ブログ記事も多くなってきたので分析をしたいと思います。
一応、Google analyticsに登録しているのでGoogleのダッシュボードを使っても十分過ぎるほど分析はできるのですが、今回はGoogle analyticsが出しているAPIを使用して分析を行っていきたいと思います。
特に、今回はAPIのクライアントのプログラムとしてpython3.5を使います。
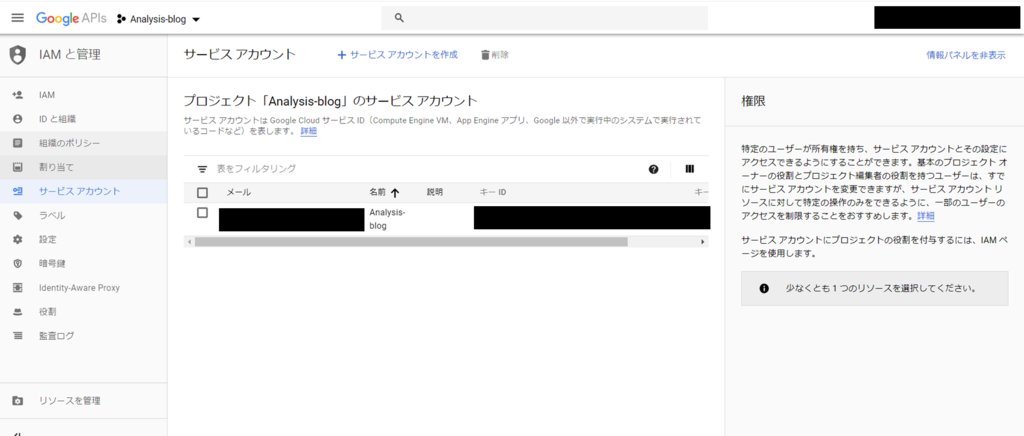
まず、APIを使うためにはGoogleのIAMの設定を行う必要があります。
IAMは誰(ID)がどのリソース(API等)をどんな権限でアクセスできるかについて設定するものです。

このように、下のサービスアカウントにアクセスするとIAMの設定ができます。
まず、サービスアカウントを作成します。
ここで、秘密鍵を保存する画面が出てくるので必ずなくさないよう保存しましょう。
さて、ここからはようやくpythonが出てきます。
クライアント側の設定はこちらもGoogleに丁寧にソースコードが貼られていたので、これを利用します。
from apiclient.discovery import build
from oauth2client.service_account import ServiceAccountCredentials


def get_service(api_name, api_version, scopes, key_file_location):
    """Get a service that communicates to a Google API.

    Args:
        api_name: The name of the api to connect to.
        api_version: The api version to connect to.
        scopes: A list auth scopes to authorize for the application.
        key_file_location: The path to a valid service account JSON key file.

    Returns:
        A service that is connected to the specified API.
    """

    credentials = ServiceAccountCredentials.from_json_keyfile_name(
            key_file_location, scopes=scopes)

    # Build the service object.
    service = build(api_name, api_version, credentials=credentials)

    return service

def get_first_profile_id(service):
    # Use the Analytics service object to get the first profile id.

    # Get a list of all Google Analytics accounts for this user
    accounts = service.management().accounts().list().execute()

    if accounts.get('items'):
        # Get the first Google Analytics account.
        account = accounts.get('items')[0].get('id')

        # Get a list of all the properties for the first account.
        properties = service.management().webproperties().list(
                accountId=account).execute()

        if properties.get('items'):
            # Get the first property id.
            property = properties.get('items')[0].get('id')

            # Get a list of all views (profiles) for the first property.
            profiles = service.management().profiles().list(
                    accountId=account,
                    webPropertyId=property).execute()

            if profiles.get('items'):
                # return the first view (profile) id.
                return profiles.get('items')[0].get('id')

    return None

def get_results(service, profile_id):
    # Use the Analytics Service Object to query the Core Reporting API
    # for the number of sessions within the past seven days.
    return service.data().ga().get(
            ids='ga:' + profile_id,
            start_date='7daysAgo',
            end_date='today',
            metrics='ga:sessions').execute()

def print_results(results):
    # Print data nicely for the user.
    if results:
        print('View (Profile):', results.get('profileInfo').get('profileName'))
        print('Total Sessions:', results.get('rows')[0][0])

    else:
        print('No results found')

def main():
    # Define the auth scopes to request.
    scope = 'https://www.googleapis.com/auth/analytics.readonly'
    key_file_location = 'secret_key.json'

    # Authenticate and construct service.
    service = get_service(
            api_name='analytics',
            api_version='v3',
            scopes=[scope],
            key_file_location=key_file_location)

    profile_id = get_first_profile_id(service)
    print_results(get_results(service, profile_id))

if __name__ == '__main__':
    main()
いろいろ書いてありますが、基本コピペでOKです。
しかし、print分だけ、python2.7用で書いてあるので、python3.5以上の方は注意が必要です。
大事な部分は下の秘密鍵のファイルのパスを入力する部分で、ここを書き換えてあげましょう。
key_file_location = 'secret_key.json'
秘密鍵ファイルには秘密鍵の他にもJSON形式で自分のアカウントに関する情報がのっているようです。
ぼくも少しつまってしまったのですが、これだけだと下記の2つのエラーが出てしまいます。
・"Access Not Configured. Google Analytics API has not been used in project [プロジェクト名] before or it is disabled.
・"User does not have any Google Analytics account."
これらには、それぞれ下記の対処が必要となります。
・"Access Not Configured. Google Analytics API has not been used in project [プロジェクト名] before or it is disabled.
Google APIsのライブラリから"Analytics API"と"Google Analytics Reporting API"を有効にします。ここで、"Analytics API"では認証情報の設定も行います。
つまり、APIが有効になってなかったんですね笑(これだからAPI素人は・・・)
・"User does not have any Google Analytics account."
Google analytics側での設定も必要みたいです。今度はGoogle APIsから離れて、Google analyticsのダッシュボードに行き、「設定」の「ユーザ管理者」を選択します。
次に、Google analyticsにアクセス可能なユーザの設定欄にGoogle APIsで作成したサービスアカウントのメールアドレスを追加します。

ようやくバグとりが終わりました・・
さて、こちらのpythonを実行してみると、次のような結果が返ってきます。

どうやらget resultsで定義されているように、今日まで7日間のセッション数の合計値が表示されるようになっているようです。
う~ん、まだまだ少ないので増やしていきたいですね。
実際にデータを整形していくのは次回としたいのですが、
簡単にmetricsとdimentionsについて説明させて下さい。
先の例では下のようにmetricsやその他のパラメータを指定することで、Google APIにこんなデータが欲しいよというクエリ(リクエスト)を投げていました。
    return service.data().ga().get(
            ids='ga:' + profile_id,
            start_date='7daysAgo',
            end_date='today',
            metrics='ga:sessions').execute()
ここでは、もっとクエリに条件を追加することで複雑なレスポンスを受けることができますが、必須なのが上記のパラメータなのです。
- ids:サービスアカウントの識別子
- start_date:欲しいデータの集計開始日(日付指定も可)
- end_date:欲しいデータの集計終了日(日付指定も可)
- metrics:欲しいデータの種類(ここではセッション数)
metricsに例えば、ga:pageviewsを入力すれば、今回で言えばpageviewの合計値が表示されます。
次にオプションとして重要なパラメータとしてdimentionsが挙げられます。
これは、metricsで欲しいデータをdimentionsで指定したパラメータでカテゴライズすることができます。
例えば、下のクエリを見てみましょう。
    return service.data().ga().get(
            ids='ga:' + profile_id,
            start_date='7daysAgo',
            end_date='today',
            dimensions='ga:day',
            metrics='ga:sessions').execute()
dimentionsではga:dayを指定していますが、これによって7日のセッション数を一日当たりのセッション数ずつに分けてレスポンスを返してくれます。
dimentionsには1つだけでなく、最大8つまでパラメータを表示することができ、metricとの組み合わせで複雑なデータを得ることができます。
最後に、このdimentionsを使うためにGoogle Analytics上で下記を有効にしなければいけないみたいです。

TypeError: Got an unexpected keyword argument "dimentions"とでるだけで、
Webにもどこにも書いていなかったので、めちゃくちゃトラシューに時間がかかりました。
皆さんもお気をつけて・・・
それでは、実際にデータをゲットして加工して表示させるプログラムについてはまた次回!